Configuration - General
This feature will allow you to configure general and client specific details that appear throughout the platform like name, country, timezone, domain, email, metadata schemes, and about information.
To access, click Configuration from the menu. Under Configuration, click General.
Name
To edit the name, click Edit at the Name row. Type in the name at the field and click Save once done. To cancel, click anywhere outside the popover.
Country
To change the country, click Edit. Search and select the appropriate country from the dropdown. You can exclude national holidays by ticking the box. Once done, click Save to finalize (or click anywhere outside the popover to cancel).
Timezone
To adjust the timezone the client operates in, click Edit. Search and select the timezone from the dropdown. Once done, click Save to finalize (or click anywhere outside the popover to cancel).
Domain
To modify the platform’s landing page domain, click Edit in the 'Domain row. In the field provided, enter the domain name and click Save.

Email
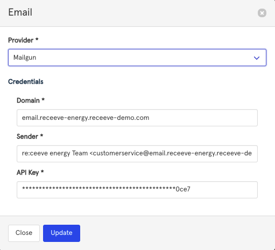
To configure the platform’s email provider, click Edit (Email row). A modal will appear on the right side of your screen showing the provider, the domain, and the sender. Click on it to edit this information.
In this modal, select the provider name from the list, enter the domain, sender, and API key. Once all of this required information is filled, click Update. Alternatively, click Close to cancel.
Content and Strategy categories
Here you can edit, add or remove categories you can use for your content and strategies:
- Click on 'Edit'; a modal will open on the right side of your screen
- To edit an existing category, click on 'edit'; you'll be able to edit the category name and style
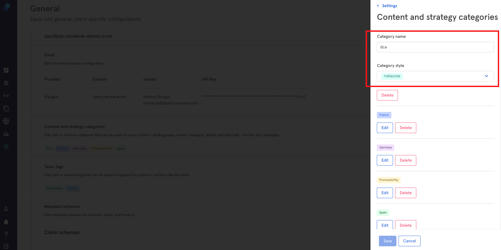
- To delete, click on 'Delete'

- To create a new category
- Click on 'Add Category'
- Choose a Category name
- Choose a category Style
- Click on 'Save' to proceed or 'Cancel' to cancel
Task tags
From this section you can edit, add or remove tags that you can use in different sections throughout the system.
To create a tag
- Click on 'Edit'; a modal will open on the right side of your screen.
- Click on 'Add tag'.
- Choose a tag name.
- Choose a tag style.
- Click on 'Save' to proceed or 'Cancel' to Cancel.

To edit a tag
- Click on 'edit'; a modal will open on the right side of your screen.
- Click on 'Edit' (inside the modal) to change the tag name and tag style.
- Click on 'Save' to proceed or 'Cancel' to Cancel.
To delete a tag
- Click on 'edit'; a modal will open on the right side of your screen.
- Click on 'Delete'
- Confirm deletion
Metadata Schemas
You might need to capture data that is not part of receeve's primary data. This is easily achieved using metadata schemas. Here we will explain you how to set up the data type so you can capture the data you need.
To alter metadata schemes for Account, Claim, and Product, click Edit at the Metadata Schemes row. In the popover, follow these steps to continue:
- Select a Schema to edit (choose from Account, Claim, or Product)
- Start adding fields by clicking 'Add Field'
- Add a property name: Alphanumeric (symbols allowed) with no spaces. ie: SpecialCondition
- Add a property type (choose from String, Number, Integer, Boolean, Object, or Array)
- Title: Alphanumeric (Symbols allowed) with spaces. ie: Special Condition
- Checkbox icon is to mark the metadata as required (check) or optional (uncheck)
- Setting icon will let you add dropdowns:
- Type dropdown values (it can be anything)
- Check editable
- Click on 'Continue'
- Cross icon lets you delete the metadata field
- Click Save to finalize
About
View the app’s version by clicking View in the About row. Click anywhere outside the slider to exit.
